In the world of collectible dolls, Blythe stands out with its distinct appearance and customizable features. One of the most rewarding aspects of being a Blythe doll enthusiast is the ability to personalize your doll, and changing its hair is one of the most impactful transformations.
How to change Blythe doll’s hair
Embarking on the journey of transforming your Blythe doll is both exciting and rewarding. With the right tools and a dash of patience, you can give your doll a refreshing new look. Here’s an enhanced step-by-step guide, inclusive of additional tips to ensure a smooth and successful hair change.
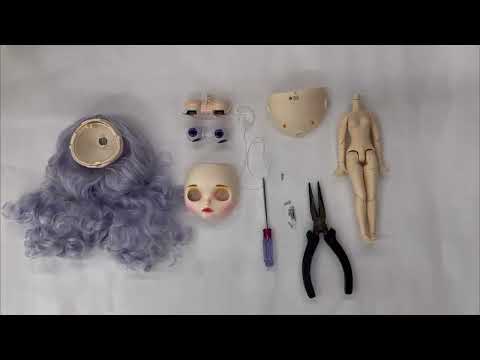
1) Preparation is Key: Gathering Your Tools Before embarking on this transformation journey, ensure you have a Philips head screwdriver or a snappy hair clip, and a soft cloth. The cloth acts as a protective layer for your doll’s delicate face during the process.
2) Beginning the Transformation: Dismantling the Head Plate Start by locating the three screws on the back of Blythe’s head plate. You’ll find two larger screws at the bottom and a smaller one at the top, above the spring. Use your screwdriver or hair clip to unscrew them, laying the foundation for the subsequent steps.
3) Gaining Access: Opening the Head With the screws removed, lay your doll on the soft cloth and gently squeeze her ears together. This action will pop open her head, granting you access to the internal components, including the old scalp that you aim to replace.
4) Out with the Old: Removing the Old Scalp Inside the opened head, identify the screw securing the old scalp. If you’re facing difficulty in removing the old scalp, consider using a hair dryer to slightly warm it up. This softens the scalp, making it more pliable and easier to remove. Loosen the screw and gently pull off the old scalp, paving the way for the new one.
5) In with the New: Installing the New Scalp With the old scalp removed, it’s time to introduce a new persona to your Blythe doll. Fit the new scalp on top of the faceplate, ensuring it’s centered and the hair is evenly distributed. Secure it with the screw, but remember not to overtighten it, as this could damage the doll’s head. This step breathes new life into your doll, marking a rebirth of sorts, with a fresh, captivating hairstyle.
6) The Finishing Touch: Reassembling the Head Now, with the new scalp firmly in place, it’s time to reassemble the head. Carefully screw back the head plate, ensuring not to pull too hard as this could warp the spring. This step seals in the new identity, completing the transformation process.
7) The Big Reveal: Admiring Your Work With the head reassembled, it’s time to step back and admire your work. Your Blythe doll now sports a fresh, new look, thanks to the new hair that you’ve skillfully installed. The transformation is not just physical but also symbolic, marking a new chapter in your doll’s life.
Use your screwdriver or hair clip to unscrew the three screws on the back of your Blythe’s head plate. Loosen the screw that secures the old scalp in place and pull it off.
Fit the new scalp on top of the faceplate and screw it in place. Screw the three screws back into the head plate.
Blythe Doll Quick Guide: Fastest Way to Disassemble & Assemble!🎥
Welcome to the most anticipated tutorial in the Blythe Doll community! This Is Blythe proudly presents a definitive, concise, and enriched guide on the art of disassembling and assembling Neo Blythe Dolls. Every step, every detail, unveiled – offering an unprecedented, immersive experience into the enigmatic world of Blythe. Why This Tutorial? We’ve identified a significant gap – tutorials that exist are prolonged, filled with excessive dialogue, leaving enthusiasts and collectors frustrated. This guide is a game-changer, a direct, no-nonsense approach ensuring you master the skills of customization swiftly and proficiently.
ℹ️ Customization and Care Tips:
Choose a hair color that complements your doll’s unique skin tone.
From sleek bobs to flowing curls, pick a style that resonates with you.
Remember, a Blythe doll’s ‘scalp’ refers to the complete hairpiece, offering a more integrated look than traditional wigs.
Maintaining Your Doll’s Beautiful Hair:
Regular brushing and gentle cleaning will keep the hair looking its best.
Avoid heat and harsh styling products to protect the delicate fibers.
✂️ Discover a World of Blythe Doll Hair Options
Seeking the perfect hair transformation for your Blythe doll? Look no further. Our Blythe Doll Hair Shop offers a curated selection of premium, diverse styles.
Quality Meets Diversity
Indulge in a collection where quality and variety converge. We provide easy-to-install, durable options in vibrant colors and natural tones, ensuring each doll radiates a unique charm.
💡 Special Offer and Colorful Choices:
Enjoy complimentary hair installation with your Neo Blythe doll purchase. Delight in our array of hair colors – from classic black and blonde to adventurous pink and silver – and find the perfect match for your doll’s new look.
🛍️ Explore Today
Changing your Blythe doll’s hair is more than a physical transformation; it’s a renewal of identity, a rebirth that infuses new life into your cherished collectible. With a little care and attention, you can easily change your Blythe doll’s hair and give her a whole new look.
Step into our shop and embark on a journey of aesthetic discovery, elevating your Blythe doll to new heights of elegance. Happy customizing!
Say hello to Jenna Anderson — our Customer Happiness Director and resident Blythe doll devotee. Affectionately known around the studio as the “Blythe Whisperer,” Jenna spends her days helping collectors find the doll that feels unmistakably theirs, and her evenings writing the stories you read here. Her warmth, eye for detail, and genuine love of these big-eyed characters make her the heart of the This Is Blythe community.
When she steps away from the inbox, you'll find her sewing tiny doll-sized accessories, behind a camera, or lost in some new arts-and-crafts project — the same curiosity and care she pours into every doll. Read more about Jenna's journey into the world of Blythe here.


Leave a comment